To create a beautiful bathroom, it is important to have a functioning bathtub. However, painting your bathtub can be a difficult task. This article will go over how to paint your tub step by step for an enjoyable and hassle-free experience.
What Is Painting a Bathtub?
painting a bathtub is not as hard as you might think. It can be as simple or as complicated as you want it to be. Follow these simple steps and you’ll be painting your bathtub in no time at all. Discover diy concrete pool.
Materials Needed to Paint a Bathtub
In order to paint a bathtub, you’ll need the following supplies:
-Tape measure
-Paintbrush
-Polyurethane or acrylic paint
-Bathtub liner
-Cleaning supplies
How to Paint a Bathtub
In this tutorial, we’ll show you step-by-step how to paint a bathtub the right way – by using a professional-grade bathtub paint and primer. So if you’re ever feeling intimidated by the prospect of painting your tub, give this tutorial a try – you won’t regret it!
1. Decide on the color scheme. Most people choose a light or dark color for their bathroom walls and then pick a complementary color for the fixtures. You can go with a neutral color if you prefer, but be sure to add in pops of color here and there to brighten up the space.
2. Prime the walls and trim. Unless you have very drywall (not common in most bathrooms), it’s a good idea to prime the wall before painting it. This will help protect the wall from moisture and other damage while you’re working.
3. Measure and cut the painters tape. The perfect size for this project is usually about 2 feet by 3 feet. Make sure the tape is long enough so that it covers the entire surface that you want to paint, and short enough so that you can easily move it around as needed.
4. Paint. Add a little extra paint to your cans, especially if you’re using a flat color like white or natural. This will help prevent drips and make it easier for you to get the right amount of paint on the wall after you transfer the tape.
5. Transfer the tape. Hold your can about a foot away from the wall, then spray and paint over the tape. When you’ve painted all of your sections, smooth out any wrinkles with an old rag or piece of cardboard, or just press down and move some tape up if it needs it. Get info about elephant decor.
Benefits of Doing A Jack Knife Flooring Installation on Your Bathroom
When it comes to your bathroom, there are many benefits to doing a jack knife flooring installation. Not only is it a unique and stylish way to update your space, but it can also provide many benefits that you may not have considered. Here are just a few:
-It Can Be A Sign of Well-Designed Space: One of the main reasons to install jack knife flooring in your bathroom is because it can be a sign of well-designed space. It can add character and class to a bathroom that may be lacking in either area, making it more appealing to potential buyers or renters. If you want to make sure your bathroom stands out from the crowd, consider opting for this type of flooring. Find out germinating seeds in paper towel.
-It Provides More Comfort: When you install jack knife flooring in your bathroom, you’re giving yourself the opportunity to experience increased levels of comfort. Not only does this type of flooring provide an extra layer of cushion when you step on it, but it can also help reduce noise and moisture levels. This is especially important if you have children or pets who use the bathroom frequently.
-It Can Improve Your Drainage: When you install a hardwood flooring in your bathroom, it can help to improve your drainage. Hardwood flooring is made up of tight grained wood that absorbs moisture and traps it underneath the surface. If you have water seeping through the flooring, the moisture may become trapped in the hardwood. This moisture can cause staining and other problems when it comes to maintaining the appearance of your bathroom.
Final Tips, Advice and Safety Precautions
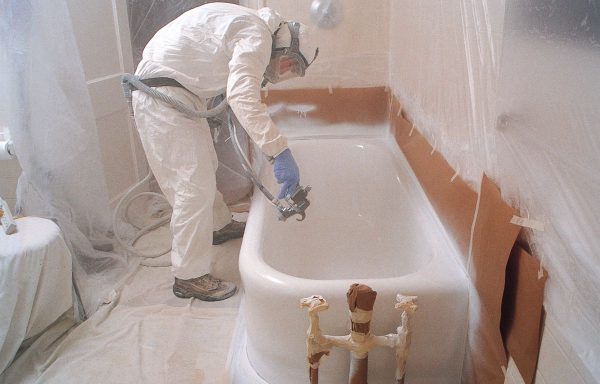
Are you thinking of painting your bathtub but feeling a bit intimidated? don’t fret, we’re here to help! in this article, we’ll share with you all the tips and advice needed to get the job done successfully. before getting started, it’s important to remember that safety is always our top priority so make sure you read through these final tips and precautions. finally, we’ll give you a rare tutorial on how to paint a bathtub – be sure to check it out!
1. Preparation is key – make sure all your materials are at the ready before beginning your project. gather your paint, brushes, and any other necessary supplies and make sure they’re clean and ready to go. also, be sure to check the floor surrounding the bathtub for any potential damage or hazards that could occur while painting.
2. Start small – if you’re feeling overwhelmed by the task at hand, start by painting just one small section of the tub. once you’ve got the hang of things, you can tackle the whole bathtub at once. Look at the ceiling decorations.
3. Take your time – there’s no need to rush when painting a bathtub – take your time and enjoy the process. keep in mind that the paint will be curing for a few weeks before it’s ready to use – so don’t rush through your project just to get it done in one sitting.
4. Clear out the area – you want to make sure that there is no clutter or other potential hazards near the bathtub when you’re painting. keep all paint, brushes, and towels at least 6 feet from anything that could be damaged by the paint or chemicals used during the painting process.