In the delicate ecosystem of a reef aquarium, stability is everything. Your corals, fish, and invertebrates thrive not just in specific conditions, but in consistent conditions. This complex hobby requires balancing many parameters, a task detailed well by resources like the Reef Aquarium Blog. Even a small deviation in alkalinity, calcium, or salinity can cause stress. However, one parameter rules them all, and its instability can lead to a tank crash faster than any other: temperature.
Of all these parameters, temperature is arguably the most critical. Corals and fish are ectotherms, meaning they cannot regulate their own body heat. They are entirely dependent on their environment. Therefore, achieving the ideal temperature for reef tank is the foundational goal for any aquarist. But this goal is meaningless if the tool measuring it is wrong. A faulty thermometer is a silent killer. This article will explore why thermometer accuracy is paramount and provide actionable tips to ensure your readings are correct.
Why Temperature Stability is King
Before we dive into the “how-to” of accuracy, we must first establish the “why.” Why is a single degree of temperature swing such a big deal?
When the water in your reef tank drifts from its optimal range, it triggers a cascade of negative biological responses. If the temperature climbs too high, even for a few hours, the first and most visible victim is your coral. Corals expel their symbiotic algae, the zooxanthellae, which provide them with both food and color. This is coral bleaching. While a minor event might be recoverable, a severe or prolonged one is a death sentence.
Furthermore, high temperatures negatively impact your fish. Their metabolism speeds up dramatically. They require more oxygen, but warmer water holds less dissolved oxygen, creating a dangerous deficit. This leads to stress, which in turn compromises their immune systems, making them easy targets for common diseases like Ich or Marine Velvet.
Conversely, a temperature drop is just as dangerous. A sudden chill can shock your livestock, crashing fish immune systems and causing corals to retract and starve. Nuisance algae often thrive in conditions that stress corals, giving them a competitive advantage. In short, your entire ecosystem is built upon a stable temperature. Your heater and chiller are the tools that provide this stability, but your thermometer is the brain that tells them what to do. If the brain is wrong, the entire system fails.
Understanding Your Thermometer: Types and Pitfalls
Not all thermometers are created equal. The $5 stick-on strip from a pet store and a $100 calibrated probe are worlds apart. Understanding the tool you are using is the first step toward accuracy.
The Classic Stick-On (Liquid Crystal)
These are thin, plastic strips that adhere to the outside of the glass. They use liquid crystal technology that changes color based on temperature.
- Pros: They are extremely cheap and easy to apply.
- Cons: They are wildly inaccurate. They measure the temperature of the glass, which is heavily influenced by the room’s ambient air temperature, not the water itself. They also fade over time and can be difficult to read. These should be considered a novelty item, not a serious tool for a reef aquarium.
The Submersible Glass (Alcohol-Based)
This is the traditional “old school” thermometer. It’s a glass tube with a colored alcohol (spirit) inside that rises and falls with temperature changes.
- Pros: They are inexpensive and do not rely on batteries. They measure the water temperature directly.
- Cons: Their accuracy is highly variable due to mass production. They can be very difficult to read through the glass and algae. Most significantly, they are fragile. A break can release the contents into your tank and leave dangerous glass shards.
The Digital Probe Thermometer
This is the most common type used by hobbyists. It consists of a waterproof probe (often on a wire) connected to a digital, battery-powered display that sits outside the tank.
- Pros: They provide an easy-to-read, precise-looking number. Many models also include an alarm for high or low temperatures.
- Cons: “Precise-looking” does not mean accurate. These units are notorious for “calibration drift,” meaning their accuracy degrades over time. The probes can fail from saltwater corrosion or water intrusion. They are also battery-dependent; a dead battery means no reading at all.
The Infrared (IR) Thermometer
This is a “point-and-shoot” gun that gives you an instant surface temperature reading.
- Pros: It provides an immediate spot-check. You can quickly measure the display tank, the sump, and even your equipment like pumps or lights.
- Cons: It is not a primary thermometer. It measures the water’s surface temperature, which can be different from the bulk water. The reading is also affected by the angle, the glass, and even reflections. It is best used as a comparative tool to see if one part of your system is hotter or colder than another, not as your main source of truth.
The Aquarium Controller Probe
For advanced reefers, the temperature probe is part of an integrated system like a Neptune Systems Apex or Hydros controller. This probe provides 24/7 monitoring and, most importantly, controls your heaters and chillers.
- Pros: This is the heart of an automated, stable system. It logs data, sends alerts to your phone, and actively manages your equipment.
- Cons: This probe carries the most risk. If it drifts and reads incorrectly, it will actively cause your heater to overheat the tank or your chiller to freeze it. Therefore, calibrating this one probe is the single most important maintenance task you can perform.
Why Your Thermometer Is Probably Lying to You
The core problem is calibration drift. Electronic components age, and saltwater is a harsh, corrosive environment. Mineral deposits and salt creep can form on probes, insulating them and skewing their readings. Glass thermometers can have manufacturing flaws.
Most hobbyists buy a digital thermometer, see that it reads “78.0°F,” and trust it implicitly. They set their expensive controller to 78.0°F and their backup heater to 77.0°F. The problem? The digital thermometer might be reading 2 degrees high, and the controller probe might be reading 1.5 degrees low.
In this scenario, the hobbyist thinks the tank is 78°F. But the controller thinks it’s 76.5°F (its low reading) and cranks the heater to reach 78°F. The actual temperature of the water then becomes 79.5°F. Meanwhile, the “backup” digital thermometer reads 81.5°F (its high reading) and its alarm goes off, leaving the reefer confused and frustrated.
This is why you can never trust a single thermometer out of the box. You must verify.
The Ultimate Accuracy Test: How to Calalate Your Thermometer
Calibration is the process of comparing your thermometer to a known, unchanging physical constant or a certified reference. For reef tanks, the easiest and most reliable method is the ice bath.
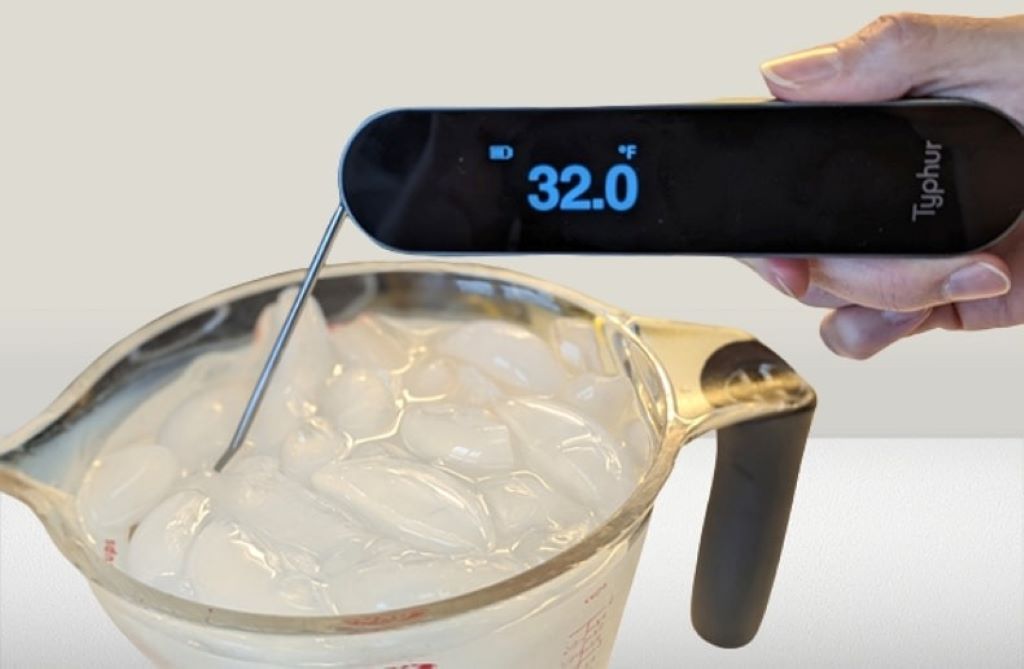
The Gold Standard: The Ice Bath Method
This method works because of simple physics. The freezing point of fresh water is a physical constant: $32^\circ\text{F}$ or $0^\circ\text{C}$. This gives you a perfect, non-negotiable baseline to test your equipment.
Here is the step-by-step process. Do not cut corners.
- Gather Materials: You will need a glass (an insulated tumbler is best), crushed ice, and fresh water (RO/DI or distilled is ideal).
- Pack the Glass: Fill the glass completely to the brim with crushed ice. Using crushed ice is important as it leaves very little space between the pieces.
- Add Water: Slowly add just enough cold, fresh water to fill the tiny gaps. Do not add so much water that the ice floats. The ice should remain packed from top to bottom.
- Stir and Wait: Gently stir the ice-water slurry for about one to two minutes. This ensures the entire mixture has reached a uniform thermal equilibrium.
- Insert Your Probe: Place your thermometer probe (or glass thermometer) into the absolute center of the ice slurry. Make sure it is surrounded by ice and not just touching the side of the glass.
- Read the Result: Wait for the reading to completely stabilize. This may take a few minutes. A perfectly accurate thermometer will read exactly $32.0^\circ\text{F}$ ($0.0^\circ\text{C}$).
What to Do With the Information
Your thermometer will likely not read $32.0^\circ\text{F}$. This difference is its “offset.”
- Scenario 1: It reads 33.5°F. This means your thermometer reads 1.5 degrees high.
- Scenario 2: It reads 31.0°F. This means your thermometer reads 1.0 degree low.
If you are using an aquarium controller (like an Apex), the fix is easy. Go into your controller’s settings, find the “Calibrate” or “Offset” option for the temperature probe, and enter the offset. In Scenario 1, you would enter an offset of -1.5 degrees to correct it.
If you are using a simple digital thermometer, it likely does not have a calibration function. Your best bet is to take a piece of masking tape, write “+1.5°F offset” (or whatever the offset is) on it, and stick it to the display. Or, better yet, throw it away and buy a high-quality, calibratable one. For a glass thermometer, you have no choice but to do the math in your head or get a new one.
Redundancy: The Two-Thermometer Rule
In a system where failure can cost thousands of dollars, you must have redundancy. Never, ever rely on a single thermometer.
The best practice is to use a high-quality, calibrated controller probe as your primary source of truth. Then, place a second, high-quality, also calibrated digital thermometer in your sump as a backup.
Check them against each other daily. They should read within a few tenths of a degree of one another. If you wake up one morning and your controller reads 78.0°F but your backup digital reads 79.5°F, you know one of them has drifted. You don’t know which one, but you know there is a problem. This is your signal to perform the ice bath calibration on both probes immediately to find the culprit.
This simple redundant system is the single best way to prevent a temperature-related catastrophe.
Placement Matters: Where to Put Your Probe
Even a perfectly calibrated probe will give you bad information if it’s in the wrong place.
The Worst Places:
- The Display Tank: It’s unsightly, and probes are often placed in low-flow corners where the temperature is not representative of the whole system.
- Directly Next to a Heater: This is the most common mistake. The probe will read the hot water coming directly off the heater, think the tank is warm enough, and shut the heater off too early. The rest of your tank will remain cold.
- In the Filter Sock Chamber: This water is coming directly from the overflow and may not have been tempered by the sump’s equipment yet.
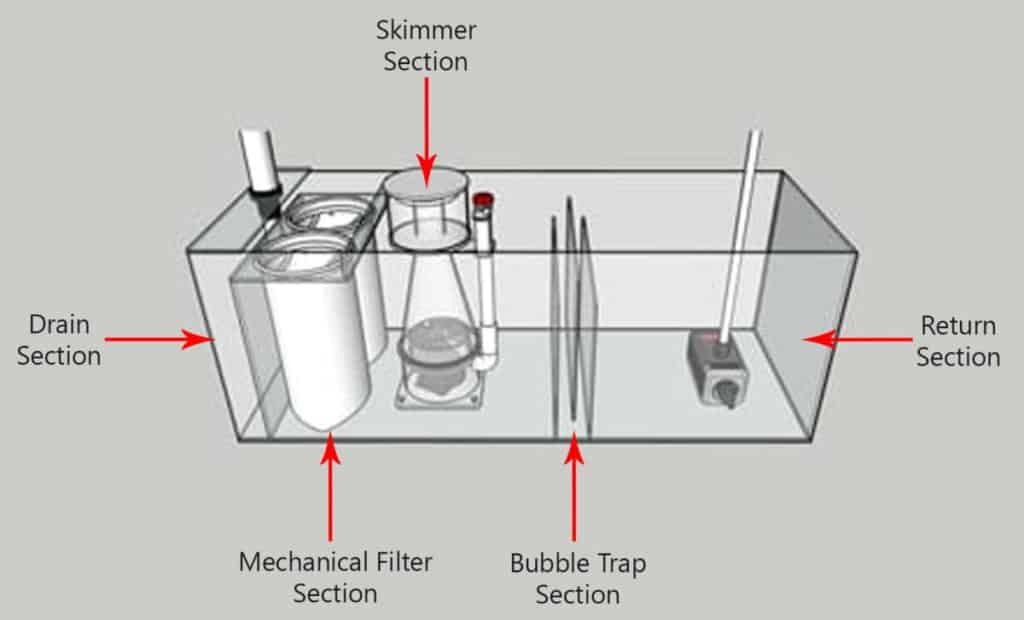
The Best Place:
The ideal location for your primary and backup probes is in your sump, in a high-flow area after the heater and before the return pump. Often, this is the return pump chamber. This location ensures you are reading the final, mixed, and tempered water before it gets sent back up to your display tank. It gives you the most accurate picture of what your corals and fish are actually experiencing.
Conclusion: Trust, but Verify
Maintaining the ideal temperature for your reef tank is a constant, non-negotiable task. The stability you work so hard to create is entirely dependent on the accuracy of your thermometer. Cheap thermometers are a liability, and even expensive controller probes will drift over time.
Do not fall into the “set it and forget it” trap. Make calibration a regular part of your maintenance routine, just like water changes. By using the ice bath method at least twice a year, placing your probes in a high-flow area of your sump, and investing in a redundant backup, you can ensure your readings are accurate. A trustworthy thermometer is the single best piece of insurance you can have for your priceless reef.
Frequently Asked Questions
-
How often should I calibrate my reef tank thermometer?
You should calibrate a brand-new thermometer immediately, right out of the box. After that, it is best practice to re-calibrate your probes every 3-6 months. At a minimum, you should perform a calibration check twice a year.
-
What is the best type of thermometer for a reef tank?
The best system is a primary temperature probe connected to an aquarium controller, which is calibrated regularly. This is supported by a secondary, high-quality, calibratable digital thermometer (also calibrated) as a redundant backup. Avoid stick-on and cheap glass thermometers.
-
Can I use a human medical thermometer to check my tank?
While a medical thermometer is generally accurate, it is not designed for this purpose. It is difficult to get a stable reading, and it is not meant for continuous or saltwater use. It is better to use the ice bath method to calibrate a dedicated aquarium thermometer.
-
My controller and my digital thermometer show different readings. Which one is right?
You cannot know which one is right (or if both are wrong) just by looking. This discrepancy is your immediate signal to perform the ice bath calibration on both probes. This test will reveal the offset for each one, allowing you to correct them and trust your readings again.
-
What is the actual ideal temperature for a reef tank?
Most reef aquarists maintain their tanks between 77°F and 79°F (approximately 25∘C to 26∘C). The exact number is less important than stability. A tank that is rock-solid at 79°F is far healthier than a tank that swings between 77°F and 80°F every day.
Related Topics:
What Investments Will Boom in 2025? Market Trends to Watch
Best Aquarium Temperature Sensors for Reef Tanks